Bread Machine Dinner Rolls Recipe
These amazing pillow-soft dinner rolls are made using a bread machine. Yes, that’s right! By using the bread dough cycle, you can create irresistible dinner rolls that will upstage the main course. Read on to learn how to easily make homemade rolls using your bread machine.

This recipe was adapted from the Soft Dinner Rolls Recipe at Sally’s Baking Addiction. Once I saw the recipe it struck me as similar to my Lambert’s Throwed Rolls clone. I put a few little twists on the recipe and they have become my family’s favorite homemade yeast rolls.
Let’s look at how to make these bread machine rolls, shall we?
Ingredients
- 1 cup whole milk
- 2 tablespoons sugar
- 1/2 cup butter, divided
- 3 cups all-purpose flour
- 1 teaspoon salt
- 2 teaspoons instant yeast – this is not the same as active dry yeast which needs to be “proofed” before using
- 1 egg

These simple homemade dinner rolls are made with seven simple ingredients, all of which should be available at your local grocery store. (If not, head to Walmart or Target and you should be able to find them.)
When I make this recipe, I love to use single-serve milk cartons that I buy at Costco. I have seen similar cartons of milk at Target (as pictured above). You can use regular milk that is refrigerated, but you will want to bring it to room temperature first. (You can microwave cold milk on HIGH for 30 seconds to warm it.)
Directions
- Place 1/4 cup butter in a microwave-safe bowl and microwave at HIGH for 30 seconds or until butter has melted.
Pour room-temperature milk into the pan of your bread machine. Add the melted butter to the milk. (Yeast likes a warm temperature – somewhere between 70 – 100 degrees Fahrenheit seems to be ideal. I find that combining melted butter to room-temperature milk works great.)
Add the flour to the bread machine along with the sugar, salt, and yeast.

You need to use the bread machine DOUGH cycle. Be sure that you have the right cycle selected – it should take 1.5 hours to complete, and press the START button.
Once you hit start, add the egg to the mixture, close the lid, and let the bread machine work its magic. (I know it seems silly, but I like watching the egg get beaten into the flour mixture.)
- When you have about 5 minutes left on the dough cycle, prepare your baking pan(s) by rubbing butter all over the bottom and sides. [You can use either a 9×13-inch baking pan or two round cake pans.] This will add flavor and help the rolls release easily from the pan(s).

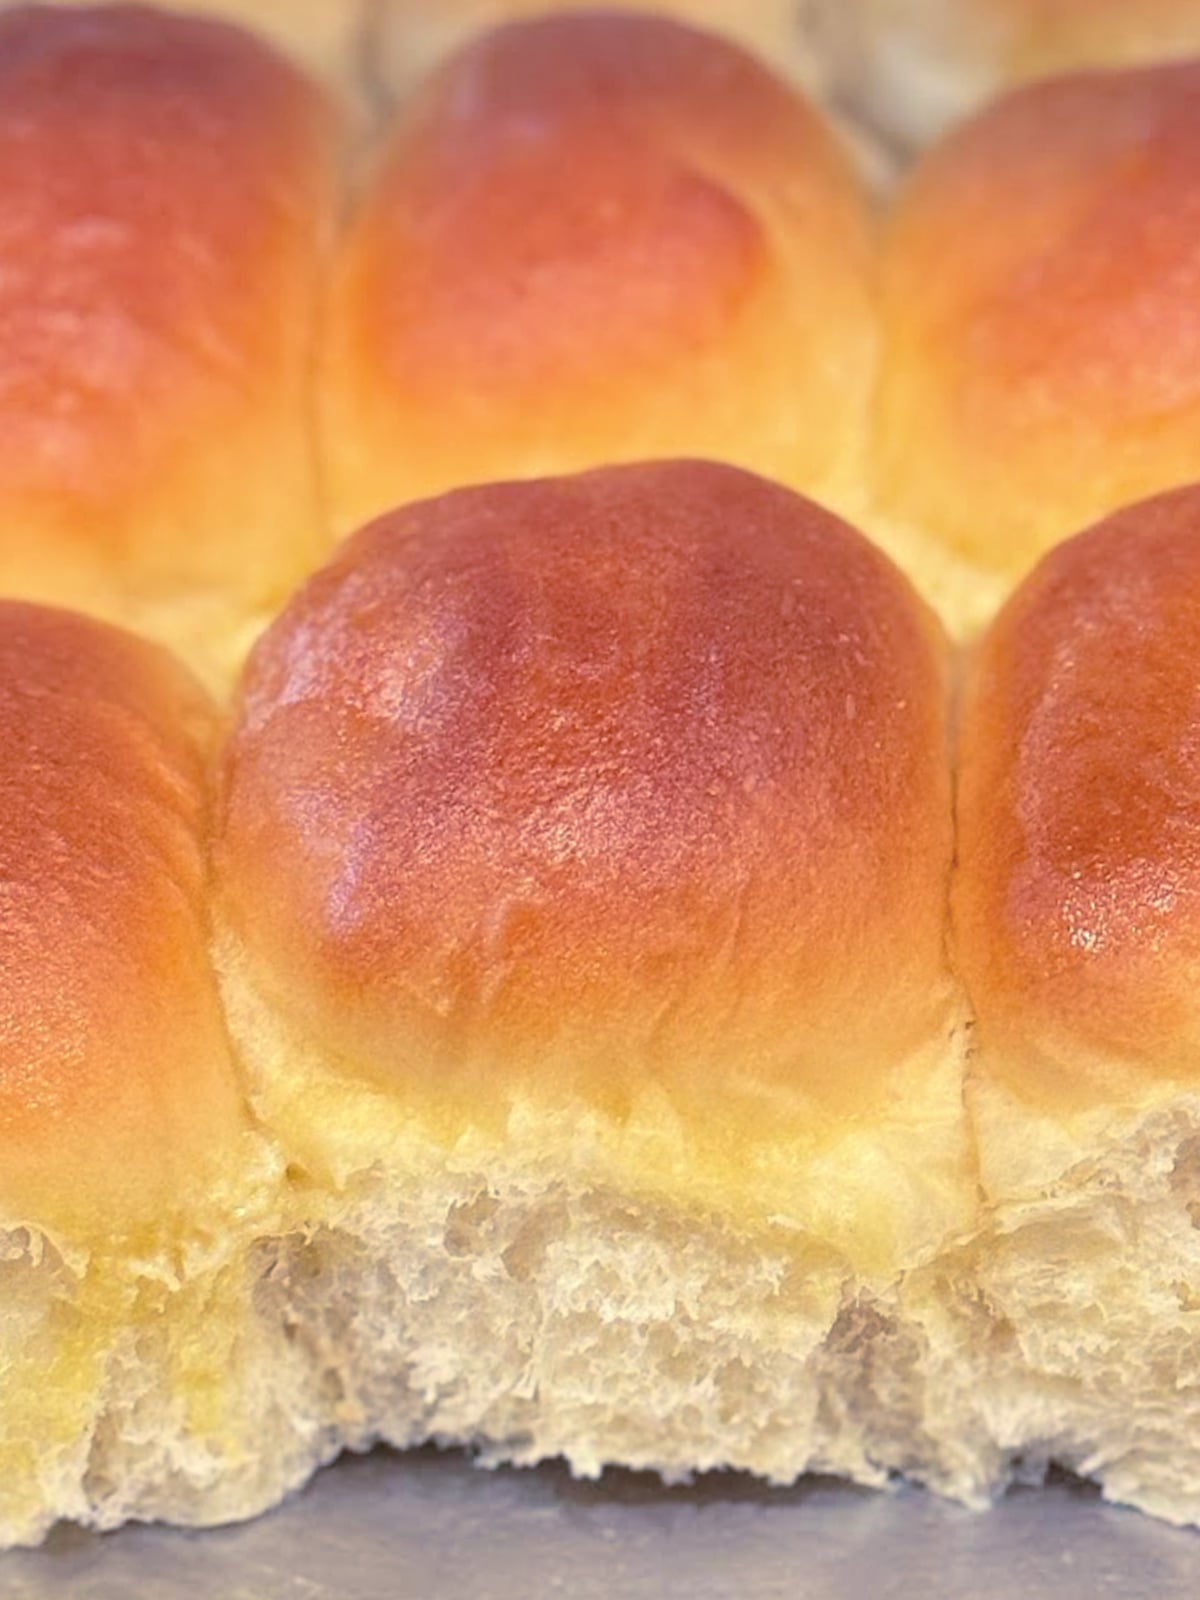
- Once the dough cycle has finished, remove the dough and place it on a lightly floured surface. Divide the dough into 16 balls.
- Shape the dough, place the dough balls in the prepared pan, and let them rise for 1 hour in a warm place. (I like to place them in my “cold” oven with just the light on.) This is considered the second rise, and the time frame is important. If you let them rise for less than an hour, they won’t be as nice and fluffy as they could be.
- When the hour is up, remove the pan from the oven and heat the oven to 350 degrees Fahrenheit. Bake the rolls for 20 minutes, or until golden brown.

- Remove the pan from the oven and spread 2 tablespoons of butter over the hot rolls.

- Let the rolls cool for several minutes in the hot pan. Place rolls on a baking rack to finish cooling. Store cooled rolls in an airtight container.

If you love the smell of freshly baked bread, you’ll want to try a few more irresistible recipes! My Braided Nutella Bread is a chocolate-lover’s dream, Caramel Sticky Buns make any morning special, and The Best Homemade Cinnamon Rolls are soft, gooey perfection fresh from the oven
Bread Machine Dinner Rolls
Ingredients
Method
- Place whole milk, melted butter, sugar, flour, salt, and instant yeast in the bread machine pan. Add the egg. Set the DOUGH cycle.
- Butter a 9×13-inch baking dish with 2 tablespoons of softened butter. Set aside.
- Once the dough cycle has finished, remove dough and place on a lightly floured surface. Divide dough into 16 balls.
- Place dough balls into baking pan in 4 roughs across and 4 roughs lengthwise. Place pan in a cold oven and turn the light on. Let the dough rise for 1 hour.
- Remove pan from oven and heat oven to 350 degrees Fahrenheit. Place baking pan into heated oven and bake for 20 minutes or until the rolls are golden brown.
- Remove pan from oven and spread 2 tablespoons of butter over the top of the hot rolls.
- Let the rolls cool for several minutes in the hot pan. Remove to a baking rack to finish cooling.
- Store cooled rolls in an airtight container.
Nutrition
Video
Tried this recipe?
Let us know how it was!If you don’t have a bread maker, be sure to visit Sally’s website for the original recipe for making these fluffy rolls without one.

Recipe Tips and Notes
You can prepare these rolls in advance and freeze the dough.
- Follow the directions for making them, divide the dough into individual balls, place on a parchment or Silpat-lined baking sheet, and freeze for several hours until the dough becomes firm.
- Take the dough balls off the baking sheet and place them in a zip-top freezer bag. Squeeze out as much excess air as possible and zip the bag closed.

To bake, remove the dough from the freezer and place it in a buttered pan. Let the rolls thaw for 3 hours or until doubled in size. The exact time will vary depending on the temperature in your kitchen. Bake at 350 degrees for 20 minutes, just like you would a fresh batch.

This dough can also be used to make cinnamon rolls.
- Roll the dough into a rectangle, slather it with softened butter, sprinkle it with cinnamon sugar, and roll it.
- Cut the dough into 16 equal parts and place in a buttered baking pan (or 2 round cake pans).
- Allow the rolls to rise and bake as you would dinner rolls. (I have divided the dough in half and baked one half as regular dinner rolls and the other half as cinnamon rolls.)


Some people like to cover the dough during rising with plastic wrap. I have not found that to be necessary, but you can cover your rolls if you’d like.
This recipe was tested using this Sunbeam bread machine, cycle #8. The rectangular baking pan is by 360 Cookware. If you use my affiliate link at 360 Cookware you’ll save 20%! Simply enter SouthernKissed in the box labeled “Add a discount code or a gift card” when you check out.
Last Bite
If these Bread Machine Dinner Rolls became a new family favorite, I’d love to hear about it! Leave a comment below, share your baking tips, or tag @southernkissed when you post your golden rolls. Don’t forget to pin this recipe – it’s one you’ll want to bake again and again!
I tried this recipe today and it turned out amazing. My kids tried it and they even said it was great. I halved the recipe and it still worked perfectly. I will definitely make these again.
I am so glad you and your children enjoyed it. (This is my personal favorite recipe.)
Quick question…can I substitute Buttermilk for the Whole Milk?
That’s a great question that, unfortunately, I cannot answer. I haven’t tried it. If you make the rolls using buttermilk, please come back and let us all know how they turned out. Please!
I “consulted” ChatGPT to see if it could shed some light. One thing that we have to take into consideration is that there is yeast, a living microorganism. The following is the response:
Absolutely. Buttermilk can totally pinch-hit for milk or water in yeast rolls—it just needs a little adjustment. Here’s the lowdown:
1. Flavor boost
Buttermilk gives a gentle tang and richer flavor. Think slightly sourdough-ish without the commitment.
2. Acidity math
Because buttermilk is acidic, it can slow yeast activity. No biggie—you can:
Add about ¼ teaspoon of baking soda per cup of buttermilk to neutralize some acidity, or
Simply allow a slightly longer rise (another 15–20 minutes usually covers it).
3. Liquid swap
Use buttermilk cup-for-cup for the liquid (milk or water) the recipe calls for. If your recipe includes extra sugar, you can leave it as is—yeast loves sugar.
4. Temperature check
Warm buttermilk gently to about 105–110°F before mixing so you don’t shock the yeast. Don’t go hotter—scalding kills yeast and your bread’s dreams.
Bottom line: Yes, sub in buttermilk and either add a pinch of baking soda or plan a longer proof. You’ll get a soft, slightly tangy roll that tastes like you fussed way more than you did.
If I wanted to make these rolls the night before, could I put them in the fridge? Before or after the second rise?
That’s a great question. Let me refer you to Sally’s Baking Addiction where she addresses this in her post for Soft Dinner Rolls.
So easy to make and the results were amazing.
Thank you! It’s one of my favorite recipes.
Literally the best dinner rolls ever, were a smash hit for Thanksgiving and will be making them for every holiday!
I am so glad you liked them and that they went over well. We will be making them for every Thanksgiving, too, and when special friends come to visit. 🙂
I made these today for our Thanksgiving and they were wonderful! What a nice easy recipe to follow. They rose so well and were soft and fluffy. Thank you so much for a great recipe!
I am glad you enjoyed them!
I’m trying so hard not to be frustrated right now but I am. The ingredient list at the top of the recipe page clearly says “1 cup butter”. So I used 1 cup melted butter. Move my way through the recipe and now it says 1/4cup butter?! I wasted all the ingredients two sticks of butter and an 1.5 time preparing for my large Thanksgiving dinner.
I am so sorry that there was a mistake in the blog post, though it clearly stated “divided,” meaning that you would not use the entire amount at once. The recipe card had/has the correct listing of the amounts that you need. I am really sorry for your frustration. I have updated the post (thanks to you) and hopefully this will be clearer to other readers.
don’t want the shift add ons, only recipe.
Feel free to scroll.
Personally, I would rather not have advertisements. But, if there were no ads, there would be no blogs. It’s not cheap making and testing recipes, paying for internet hosting, paying for tech support, etc. Thanks for your understanding.